
Someone wants to pay you a $150 booking deposit. You have a WordPress site and a contact form. The usual advice is to install WooCommerce, set up a store, create a product, configure a cart and a checkout page, and send your customer through all of it, just to collect one payment on one form.
There’s a simpler way: a payment form without WooCommerce, where the payment happens on the form itself. In this guide we’ll show you how to set one up with Stripe or PayPal, what to check before you take real money, and the one technical detail that separates a safe payment form from one that can be cheated.
Why a store is usually the wrong tool for one payment
WooCommerce is excellent software, built for running a store: a catalog, inventory, shipping, taxes and customers who browse before they buy. Most people who need “a payment on a form” have none of that. They have:
- A booking deposit
- A registration fee for an event
- A donation with suggested amounts
- An invoice a client needs to pay
- One service at one price
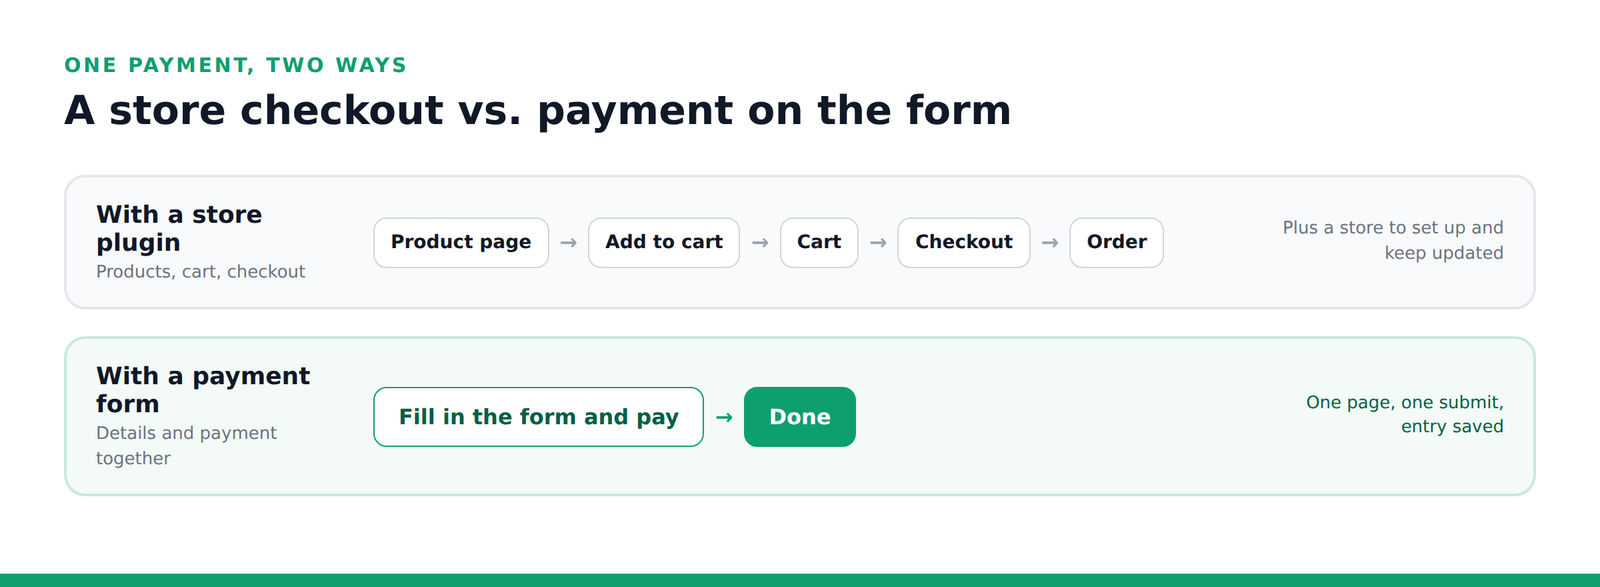
For these, a store is something you set up and maintain forever in exchange for a transaction that takes seconds. It also adds pages between “I want to pay you” and “payment complete,” and every extra page is a place people can give up.
What a good WordPress payment form needs
Whatever plugin you choose, check it does these six things:
- Takes the payment on the page, or in a quick popup, so the customer doesn’t feel sent away from your site.
- Shows a live total that updates as people choose options and quantities.
- Verifies the amount on the server. This is the one that gets skipped, and it matters most. More below.
- Supports the ways people pay, such as cards, Apple Pay, Google Pay and PayPal.
- Keeps a record of every order you can find later, tied to the payment.
- Doesn’t take a cut. Some form plugins add their own fee on top of Stripe’s. WPForms Lite, for example, adds 3% to every Stripe payment, according to its own documentation.
Below is how this works in Custom Contact Forms Pro. We make it, so we’re telling you that up front. The checklist above applies to any plugin you consider.
How to create a payment form without WooCommerce
Step 1: Install Custom Contact Forms and Pro
Install the free Custom Contact Forms plugin from WordPress.org, then Custom Contact Forms Pro on top of it. Pro adds the payment fields to the same drag-and-drop builder, and your existing forms keep working.
Step 2: Connect Stripe or PayPal
Go to Forms → Integrations and open Stripe Payments. Choose your currency, set the mode to Test, and paste in your test keys from your Stripe Dashboard. You’ll switch to your live keys once everything works.

Prefer PayPal? Open PayPal on the same screen and add your PayPal client ID and secret. Buyers approve the payment in a PayPal popup and the form submits as soon as it completes. Each form uses one payment method: either Stripe or PayPal.
Step 3: Start from a payment template
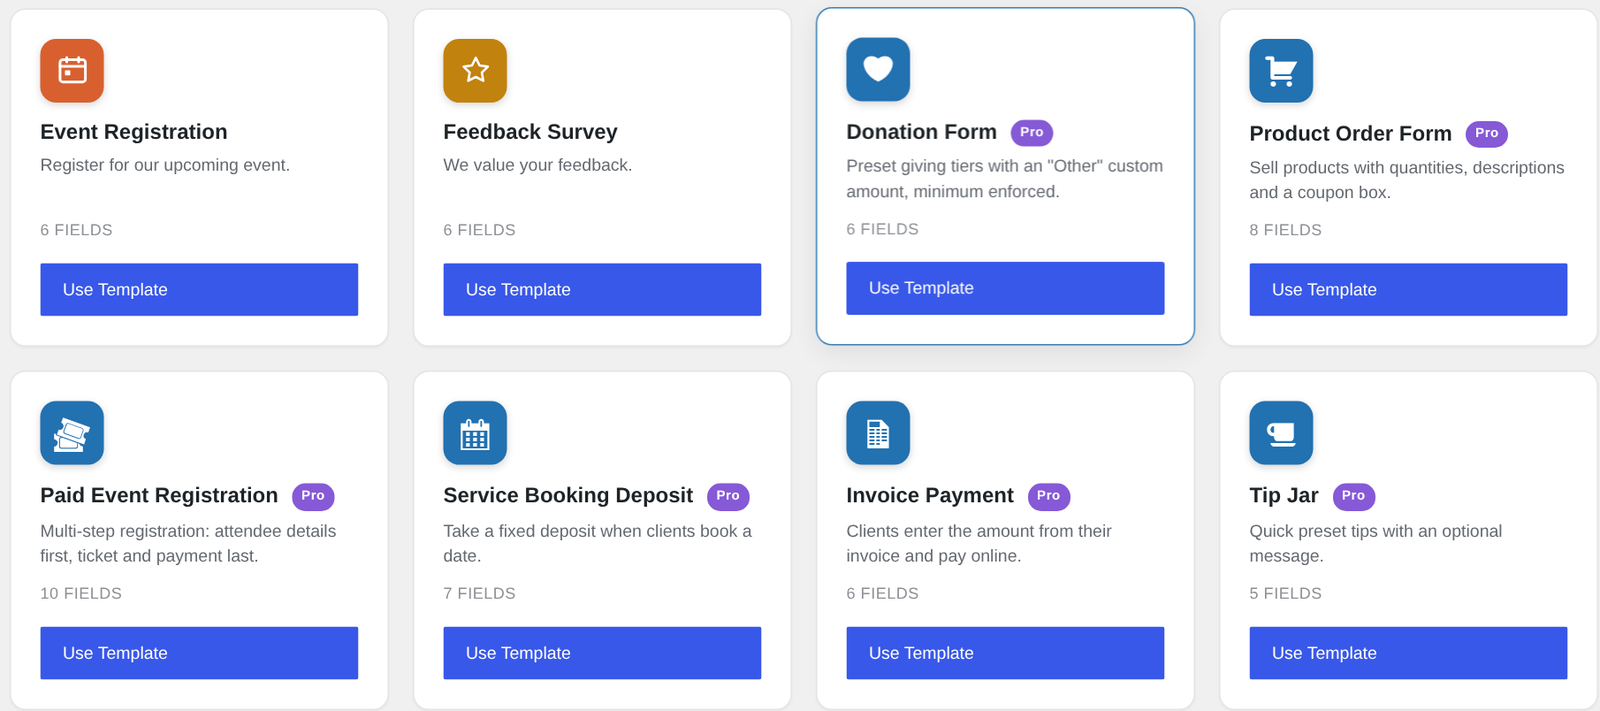
Go to Forms → Templates. Pro adds ready-made payment forms you can use as they are or adjust: Donation Form, Product Order Form, Paid Event Registration, Service Booking Deposit, Invoice Payment, Tip Jar and Course Signup, plus agreement templates that combine a signature with a deposit.
Step 4: Set your prices
Every payment form is built from a few fields: one or more Product fields for what you’re charging, a Total that adds them up live, and a Stripe Card field (or a PayPal field) where the payment happens. Click a Product field to set its price. There are three pricing modes:
| Pricing mode | What it does | Use it for |
|---|---|---|
| Single product | One item at one set price | Deposits, registration fees, a single service |
| Multiple options (dropdown) | Each choice has its own price | Ticket types, packages, donation amounts |
| Customer chooses amount | The buyer types the amount, with a minimum you set | Donations, invoice payments, tips |
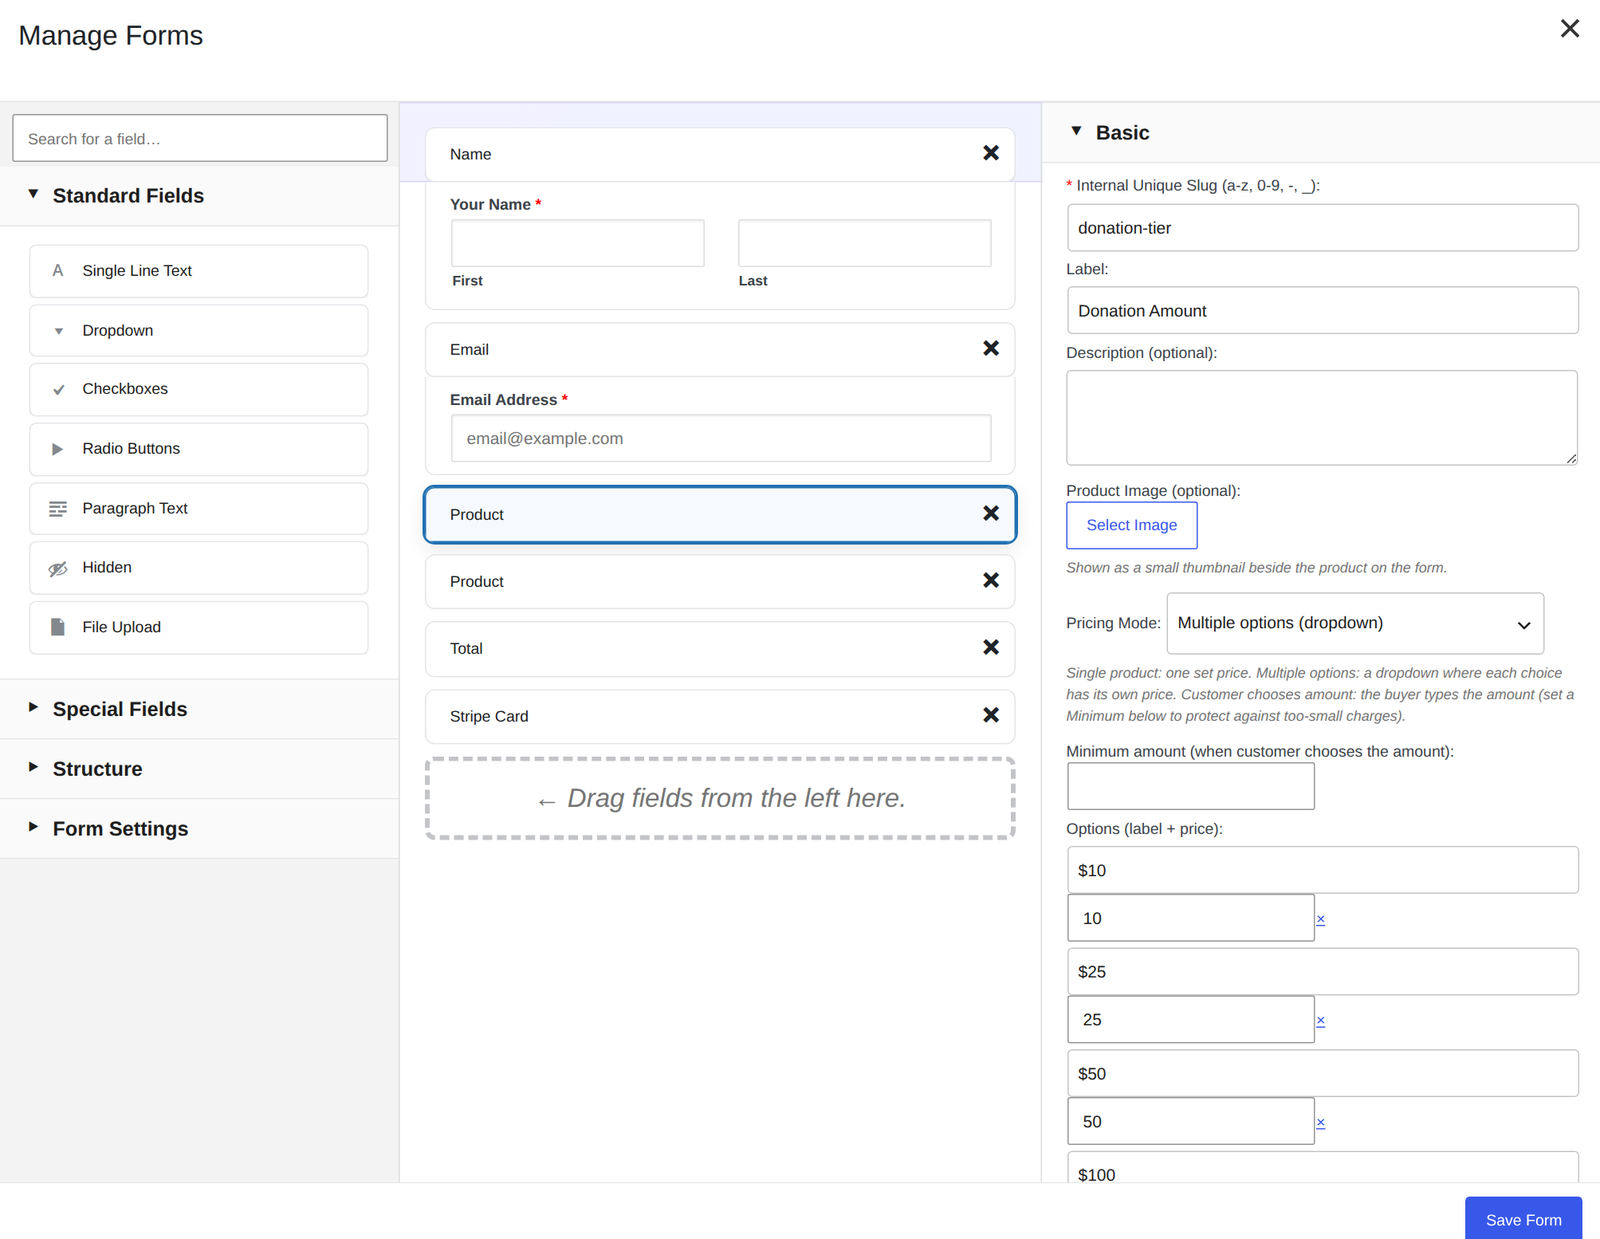
You can add as many Product fields as you need, such as a main item plus optional extras, and turn on quantities with a minimum and maximum. Add a Coupon field to accept percentage or fixed discount codes, which you manage under Forms → Coupons with expiry dates and usage limits.
With the Stripe Card field on the form, buyers pay on the page with a card, Apple Pay, Google Pay or Link, and the button shows the amount, for example “Pay $150.00.” If you leave the card field out, forms with a Total send buyers to Stripe’s hosted checkout page instead.
Step 5: Test it, then go live
- Test a payment. In test mode, Stripe’s test card
4242 4242 4242 4242with any future expiry date and any CVC completes a successful payment. - Test a decline too. The card
4000 0000 0000 0002is always declined, so you can see what your customer sees when a card fails. - Register your domain in Stripe under its payment method domains settings. Stripe requires this before Apple Pay, Google Pay and Link appear in an on-page payment form.
- Turn on Stripe’s email receipts under Settings → Business → Customer emails → Successful payments. The form passes the buyer’s email address to Stripe. Stripe doesn’t send automatic receipts for test payments, so you’ll see them once you’re live.
- Clear your site cache after any change and check the form in a private window, so you’re seeing the live version.
When the test payments look right, switch the mode to Live and add your live keys.
The part that matters most: server-side verification
A payment form shows a total in the browser so the buyer can see it. But anything in the browser can be changed by someone with their browser’s developer tools open. If a form charges whatever total the browser sends, someone can pay $0.50 for your $500 service.
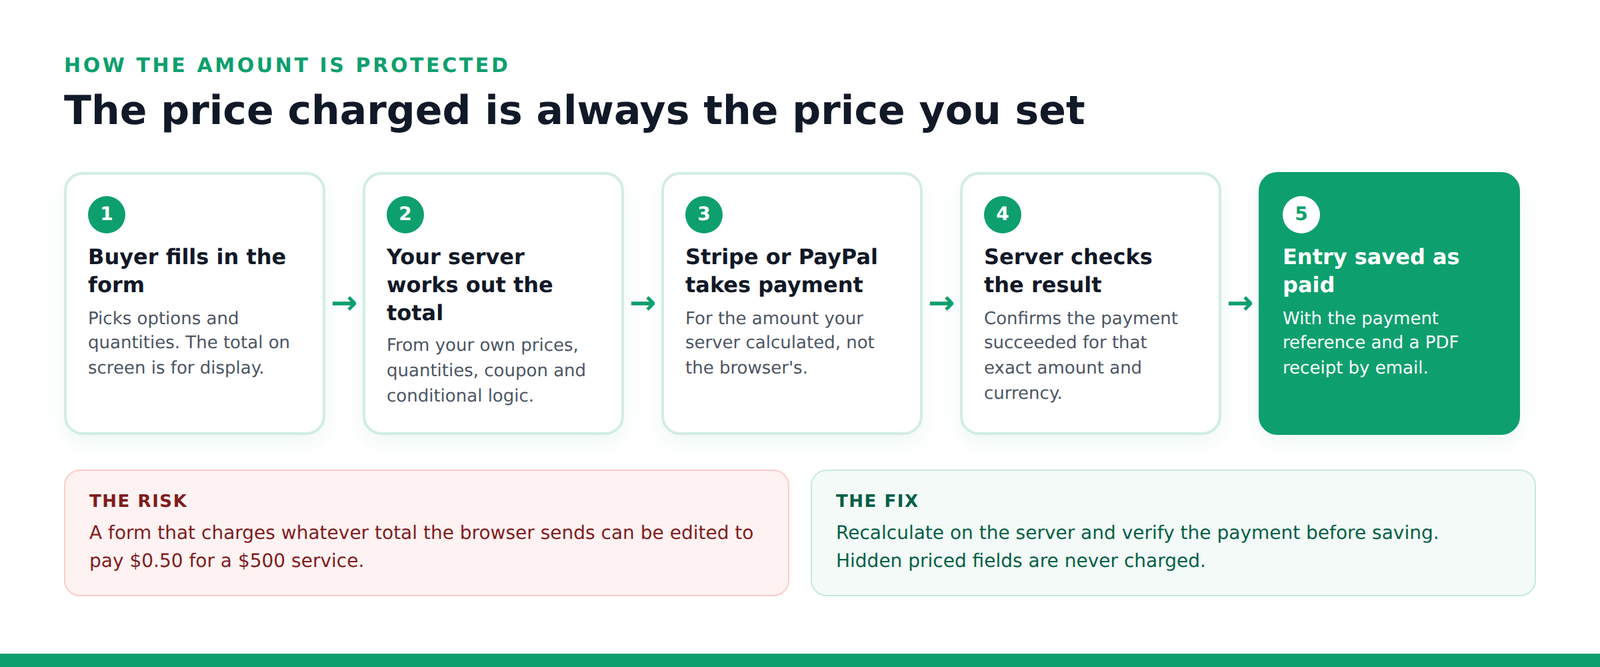
In Custom Contact Forms Pro, the total shown in the browser is for display only. Your server works out the amount from your own prices, quantities, coupon and conditional logic, and that’s the amount Stripe or PayPal is asked to charge. When the form is submitted, the server checks that the payment succeeded for exactly that amount and currency before the entry is saved as paid. A priced field hidden by conditional logic is never charged.
Whatever plugin you choose, ask whether it verifies totals on the server. If the documentation doesn’t say, assume it doesn’t.
What happens after someone pays
- The entry is saved and marked paid, with the amount and the payment reference, so you can match it to the payment in your Stripe Dashboard.
- A PDF receipt is attached to the form’s notification emails, with a “Payment Receipt” heading, a PAID stamp, the reference and the details the buyer entered. You can also download any submission as a PDF.
- Signatures and agreements stay on the same form. Add the free signature field for waivers and contracts, or Pro’s consent field, which keeps a permanent copy of the exact terms each person agreed to.
- Longer forms can be split into steps with a progress bar, putting the payment on the last step. The Paid Event Registration template is set up this way.
Common payment forms you can build
- Booking deposits: a single product at a fixed price plus your usual contact fields. The Service Booking Deposit template is ready to go.
- Donations: preset amounts in a dropdown, with an “Other” choice that reveals a custom amount with a minimum. That’s the Donation Form template.
- Event tickets: ticket types with quantities, attendee details first and payment last.
- Invoice payments: clients type the amount from their invoice and pay online.
- Product orders: products with quantities, optional extras and a coupon box.
What it costs
Stripe and PayPal charge their standard processing fees. Every option has those.
The difference is what the form plugin adds. Custom Contact Forms Pro is $80 a year with every feature included, on unlimited sites you own, and no added transaction fees, so your cost doesn’t grow with your sales. The free plugin stays free. See the pricing page for everything that’s included, or Free vs Pro for a side-by-side comparison.
Frequently asked questions
Do I need WooCommerce to accept payments in WordPress?
No. A form plugin with payment fields can take payments without WooCommerce. If you already run a WooCommerce store for other things, the two work side by side.
Can one form take both Stripe and PayPal?
Each form uses one: the Stripe Card field or the PayPal field. You can have Stripe on one form and PayPal on another.
Which payment methods are supported?
On-page Stripe payments accept cards, Apple Pay, Google Pay and Link. PayPal payments go through a PayPal popup. Payment methods that take days to confirm, such as bank debits, Klarna and Cash App Pay, aren’t supported on-page, because a form submission can’t wait for them.
Can I take recurring payments or subscriptions?
No. Custom Contact Forms Pro takes one-time payments. For subscriptions, use a tool built for recurring billing.
How do I find a payment later?
Every paid entry stores the Stripe payment reference, which starts with pi_, and the same reference is printed on the PDF receipt. Search for it in your Stripe Dashboard to open the same transaction.
Does the free plugin take payments?
No. Payment fields are part of Pro. The free Custom Contact Forms plugin includes saved entries, the signature field, Mailchimp, webhooks and spam protection.
Take your first payment this week. Get Custom Contact Forms Pro, start from a payment template, and test it in Stripe’s test mode before you go live. $80 a year, unlimited sites you own, no added transaction fees.
Free on WordPress.org
Never lose another form entry
Custom Contact Forms saves every entry on your site and includes conditional logic, file uploads, a signature field, Mailchimp, webhooks and spam protection, all free.
Get our new form guides by email
Practical guides on forms, email delivery and spam, plus news when Custom Contact Forms gets new features.
We only use your email to send our guides and news. Unsubscribe anytime. Privacy Policy